R3verb
Time to add some coral!
So I'm sick of my 90 gallon tank, it's time for something new! We just moved and unfortunately, I lost a fish (my yellow tang) and my long spine black urchin. That leaves me with just my Clarki clown fish and my black domino damsel. It was a hard move and even though everything went up pretty quickly, I think the sand just had too much ammonia in it. They will be missed.
With only those two fish left, It gives me the option to go a little smaller and a lot nicer. It's actually a blessing in disguise since our new house is a lot smaller than our old place and a smaller tank will fit the room a lot better.
Here are the things I HATED about my 90 gallon:
-The hood was heavy and had to be lifted off the tank every time I wanted to get into the tank
-The overflow was noisy
-The stand had a tiny little door in the middle that was the only way to service anything in the sump
-You could only fit a 15 gallon sump in the tiny compartment under the tank
-No room for reactors or 2 part
-The ATO was an orange Home Depot bucket that sat next to the tank in the living room
-Acrylic, nuff said
Here is what I'm doing to fix these problems:
-Rimless 60 gallon GLASS tank with a suspended LED light fixture. This means glass (no more scratching the tank with your fingernail!), an open top so I can always easily get cleaning tools in and the suspended LED fixture means I don't have to move the hood to get into the tank. I should also get better gas exchange this way!
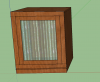
-Custom stand. I will be building the stand myself to match the entertainment center.
-Better overflow design. While I will still only have 1 overflow pipe, I am going to have the room to make a silencer so keep the noise down.
-Plumbing down to the basement. This should help with noise as well as ease of access to the sump. With the sump in the basement, I can go BIG (55 gallon breeder custom sump is what I'm going for) and with it being open and at chest level, It will be a lot easier to service, do water changes, add 2 part, get the ATO out of the living room and hopefully even give me room for a refugium!
I'll take some pictures and upload the design for the stand tomorrow but get ready, this is going to be a fun thread!
With only those two fish left, It gives me the option to go a little smaller and a lot nicer. It's actually a blessing in disguise since our new house is a lot smaller than our old place and a smaller tank will fit the room a lot better.
Here are the things I HATED about my 90 gallon:
-The hood was heavy and had to be lifted off the tank every time I wanted to get into the tank
-The overflow was noisy
-The stand had a tiny little door in the middle that was the only way to service anything in the sump
-You could only fit a 15 gallon sump in the tiny compartment under the tank
-No room for reactors or 2 part
-The ATO was an orange Home Depot bucket that sat next to the tank in the living room
-Acrylic, nuff said
Here is what I'm doing to fix these problems:
-Rimless 60 gallon GLASS tank with a suspended LED light fixture. This means glass (no more scratching the tank with your fingernail!), an open top so I can always easily get cleaning tools in and the suspended LED fixture means I don't have to move the hood to get into the tank. I should also get better gas exchange this way!
-Custom stand. I will be building the stand myself to match the entertainment center.
-Better overflow design. While I will still only have 1 overflow pipe, I am going to have the room to make a silencer so keep the noise down.
-Plumbing down to the basement. This should help with noise as well as ease of access to the sump. With the sump in the basement, I can go BIG (55 gallon breeder custom sump is what I'm going for) and with it being open and at chest level, It will be a lot easier to service, do water changes, add 2 part, get the ATO out of the living room and hopefully even give me room for a refugium!
I'll take some pictures and upload the design for the stand tomorrow but get ready, this is going to be a fun thread!
Attachments
Last edited by a moderator: