little_fish
Moderator
Basics of Building an Algae Scrubber
By: Santa Monica
February 2011
What is an Algae Scrubber? It is a device you build yourself which grows algae outside of your tank, so that the algae won’t grow inside your tank. Algae is the main filter for the oceans and lakes, and algae makes most of the food there too. Algae WILL find a way to grow. So instead of fighting it, just let it grow naturally. In doing so, the algae will absorb ammonia, ammonium, inorganic nitrate, inorganic phosphate, nitrite, metals (including copper), and CO2. The algae will raise pH, and add oxygen, carbohydrates, vitamins, proteins, enzymes, lipids, amino acids, and last but not least (if saltwater) baby copepods to the water. In other words, the algae will do exactly what they do in oceans and lakes. And yes, this means they work in both fresh and salt water. Google “primary production” or “microbial loop” to learn more.
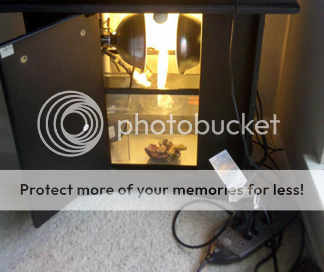
Completed algae scrubber in a sump:
Algae scrubbers were invented in the 1970’s by Dr. Walter Adey, who at the time was managing the aquatics department at the Smithsonian Institution. He came up with the name “Algae Turf Scrubber” or “ATS”, which many people still use today. He patented a design which uses a dumping bucket to dump water on a screen, but he never tried to sell this design to the public. He did let a few other people sell them, but the designs were expensive, noisy, unreliable, and had a lot of spray and salt creep. Because of this, all sales eventually stopped by the late 1990’s. And since the designs were very hard to build yourself, nobody tried. It should also be noted that although the word “turf” is in the ATS name, turf is no longer the type of algae that you want to grow; instead you want to grow green hair algae, which filters much better than turf does. If you build your algae scrubber correctly, you will eventually get green hair algae.
In August 2008, it was discovered that you can make a simple, cheap and quiet algae scrubber at home with just pvc pipe and knitting screen. Thousands of people have since made their own algae scrubbers, and the scrubbers usually eliminated the nuisance algae in their tanks within eight weeks. It’s simple: The more algae that grow on the algae scrubber, the less that grow in your tank!
Construction:
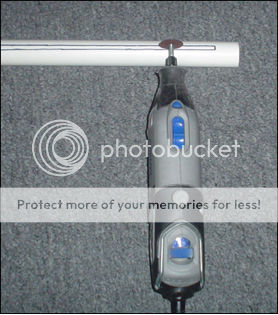
Pipe: A basic algae scrubber starts out with a ¾” (1.88 cm) pvc pipe, with a 1/8” (3mm) slot cut along the length of it (the slot is only on the bottom side; it does not go through to the top side). Mark the slot with a marker, and cut it with a Dremel or similar power tool:
Cutting this slot is actually the only hard part of building an algae scrubber. If you don’t think you can do it, just ask another hobbiest to do it for you; a cabinet maker or model builder could also do it. It will probably take a few tries, so give yourself some time and some extra pipe to get it right. As a last resort, you could try using a drill to make a series of 1/8” holes really close together, and then use a file to open them all up into a slot.
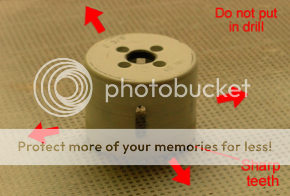
Screen: Next, get a piece of “plastic canvas” (otherwise known as “knitting screen”) at your local sewing or crafts store, or online. Rough it up REALLY good with a “hole saw” from your hardware store:
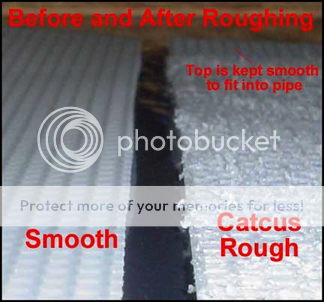
If you can’t get a hole saw, then scrape a wood-saw blade sideways across the screen in different directions. A rough screen is very important; the amount of filtering a scrubber can do is proportional to how much the screen can hold on to the algae, without the algae being washed away. Spend some time making every part of the screen super rough, like a cactus:
Tilting the hole-saw will help. Make the first pass in one direction, then do another direction. Repeat on the other side. When roughing the edges, go outwards. Be careful on the other side of the screen, since it will rip more easily than the first side. If you do rip a small piece, the screen will still work fine. Do not ever use a non-roughed screen; the algae will fall right off and you will have no filtering. Now slip the screen into the slot, and attach it with zip-ties wrapped around the pipe:

The bottom of the screen should go into the sump water an inch or so, to keep the flow quiet and bubble-free.
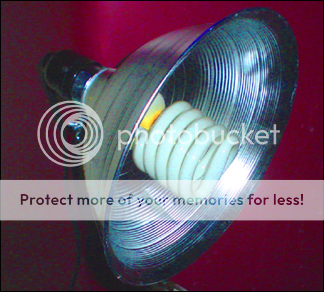
Lights: Attach your lights on both sides, and point them to the middle of the screen. The bulbs should be about 4” (10cm) from the screen. Simple curly-Q spiral CFL (compact fluorescent) bulbs with clip-on sockets work fine; CFL spotlights/floodlights do not work as well because they focus too much light on one spot, and don’t light the surrounding areas enough. Get bulbs that say “warm” or “soft”. Put the bulbs on a timer, so that they are on for 18 hours a day, and off for 6 hours. NEVER let the bulbs run 24 hours, because you will get no filtering. Lastly, a larger screen should have more bulbs, so the screen gets an even amount of light across it:
Now connect your pump (or overflow) to the pipe (the water should flow 24 hours). Don’t worry if the flow is not even from one side of the slot to the other; as the algae grows up and into the slot, the flow will even out. Now, just wait for the growth! You should start seeing improvements in your tank after you have cleaned off about four full screens of algae.
Weekly Cleanings: Every 7 days, you need to turn the flow off and remove the screen from the pipe. Take the screen to your sink, and remove most of the algae while the tap water flows over it. Leave some algae on the screen, so that it can still filter, and so it will grow back quickly. Your first or second week might not grow too much, especially if you are not feeding much (like on a new or cycling tank), but later on it will fill in faster. Also clean the slot with a toothbrush before putting the screen back.
Sometimes, the screen will starting growing dark, slimey algae right away, which looks like oil or tar. This happens when the nitrate and phosphate in your tank are very high. If your scrubber is powerful enough (strong lights, fast flow, and high roughness on the screen), then it may start growing green after a few more days, and be mostly green by the end of the week. But if your scrubber is not powerful enough, and it never starts growing green, then you’ll need to clean the dark stuff off before 7 days. This is because the dark algae block the light from reaching the bottom algae layers. So if the screen stays dark, clean it every 3 days until it starts turning a lighter brown. After that, switch to 5 days until it starts growing green. Once it starts growing green, switch to 7 days from that point on.
The biggest mistake people make when running a new scrubber is not cleaning it every 7 days. If you wait longer than this, too much algae will grow on the screen, and it will block light from reaching the “roots” of the algae. This causes the algae to die and break off, and go into your tank. This doesn’t hurt anything, of course, since it’s just algae, but it still puts nitrate and phosphate back into your tank, which defeats the purpose of the scrubber. So just clean every 7 days and it will be fine.
Growth: When new screens start out, they almost always just have a light brown coating of slimy algae (diatoms). After the first cleaning, and into the second week, it usually gets darker, and by the fourth week and forth cleaning it, can get pretty thick. It’s important to realize that all algae remove nutrients (nitrate and phosphate) from your tank, so any algae that grows on your screen is algae that can’t grow in your tank. As the nutrients in your tank come down, the type of growth on the screen will change. Here are some different types of growth you might experience:
Light Brown Slime: New screens, and sometimes older screens the day after they are cleaned. Perfectly normal.
Black Oil/Tar: Very high nutrients in tank. Screen must be cleaned every 3 days until growth is not so dark. Stronger lights will fix it faster.
Green Spaghetti/Confetti: This is the best type of growth, because the light-green color and open structure allow light and water to penetrate through all parts of the algae.
Also, it is more firm and compact, like a sponge or chaeto, and will not let-go and clog drains easily.
Long Thin Green Hair: This types occurs mostly in freshwater, and filters a lot because the light and flow go throughout the algae. But depending on how you build your scrubber, the strands may get so long they break off or slow down the drain. Adding a bit of Mono Potassium Phosphate to the water, to increase the phosphate, may help fix this and make it growth thicker.
Yellow Rubber or Yellow Slime: Your flow is too low, and is not delivering enough iron to the algae. If you can’t increase the flow, then run the bulbs a few hours less each day. You can also try adding iron to the water, such as Kent’s Iron + Manganese.
Cyano: Your light is too weak.
Big Bald Spot In Middle: Your flow is too low near the light, or you used spotlights instead of spiral bulbs and big reflectors. If you can’t increase the flow, then run the bulbs a few hours less each day. Adding iron may help here too.
Mysteriously Appearing Small Bald Spots: If the growth is thick, but new irregularly shaped bald spots appear each day, then the algae is letting go from the screen. Your screen needs to be rougher. If you can’t do this, then either reduce the flow, or clean more often, so it does not get so thick and heavy.
Types Of Tanks: This DIY simple scrubber is meant to be used in normal sumps which sit under the tank. If you don’t have a sump, or if you have a nano with a “sump” behind the back wall, then it gets more complicated, and will require more research on your part before attempting to build a suitable scrubber.
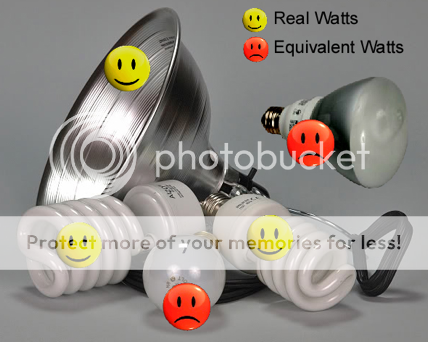
Size: To determine the size of the screen, and wattage of the bulbs, use these guidelines: The total wattage is the wattage all the bulbs combined . The total area of the screen is width X height, i.e., a screen that is 10 X 10 has an area of 100, not 200. Here are the guidelines:
• Use 0.5 actual (not equivalent) fluorescent watts total per gallon minimum [0.13 watts per liter].
• Use 1.0 actual (not equivalent) fluorescent watts total per gallon for high filtering [0.26 watts per liter].
• Make the screen 1.0 square inches per gallon, with bulbs on both sides (10 x 10 = 100 square inches = 100 gal) [1.64 square cm per liter]
• Flow is 35 gph per inch of slot length [60 lph per cm]. This assumes the slot is 1/8” (3mm) wide.
For more detailed information, or to ask questions, go to AlgaeScrubber.Net. You now have all the info you need to build yourself a super simple and cheap filter, and say goodbye to the nuisance algae in your tank!
By: Santa Monica
February 2011
What is an Algae Scrubber? It is a device you build yourself which grows algae outside of your tank, so that the algae won’t grow inside your tank. Algae is the main filter for the oceans and lakes, and algae makes most of the food there too. Algae WILL find a way to grow. So instead of fighting it, just let it grow naturally. In doing so, the algae will absorb ammonia, ammonium, inorganic nitrate, inorganic phosphate, nitrite, metals (including copper), and CO2. The algae will raise pH, and add oxygen, carbohydrates, vitamins, proteins, enzymes, lipids, amino acids, and last but not least (if saltwater) baby copepods to the water. In other words, the algae will do exactly what they do in oceans and lakes. And yes, this means they work in both fresh and salt water. Google “primary production” or “microbial loop” to learn more.
Completed algae scrubber in a sump:
Algae scrubbers were invented in the 1970’s by Dr. Walter Adey, who at the time was managing the aquatics department at the Smithsonian Institution. He came up with the name “Algae Turf Scrubber” or “ATS”, which many people still use today. He patented a design which uses a dumping bucket to dump water on a screen, but he never tried to sell this design to the public. He did let a few other people sell them, but the designs were expensive, noisy, unreliable, and had a lot of spray and salt creep. Because of this, all sales eventually stopped by the late 1990’s. And since the designs were very hard to build yourself, nobody tried. It should also be noted that although the word “turf” is in the ATS name, turf is no longer the type of algae that you want to grow; instead you want to grow green hair algae, which filters much better than turf does. If you build your algae scrubber correctly, you will eventually get green hair algae.
In August 2008, it was discovered that you can make a simple, cheap and quiet algae scrubber at home with just pvc pipe and knitting screen. Thousands of people have since made their own algae scrubbers, and the scrubbers usually eliminated the nuisance algae in their tanks within eight weeks. It’s simple: The more algae that grow on the algae scrubber, the less that grow in your tank!
Construction:
Pipe: A basic algae scrubber starts out with a ¾” (1.88 cm) pvc pipe, with a 1/8” (3mm) slot cut along the length of it (the slot is only on the bottom side; it does not go through to the top side). Mark the slot with a marker, and cut it with a Dremel or similar power tool:
Cutting this slot is actually the only hard part of building an algae scrubber. If you don’t think you can do it, just ask another hobbiest to do it for you; a cabinet maker or model builder could also do it. It will probably take a few tries, so give yourself some time and some extra pipe to get it right. As a last resort, you could try using a drill to make a series of 1/8” holes really close together, and then use a file to open them all up into a slot.
Screen: Next, get a piece of “plastic canvas” (otherwise known as “knitting screen”) at your local sewing or crafts store, or online. Rough it up REALLY good with a “hole saw” from your hardware store:
If you can’t get a hole saw, then scrape a wood-saw blade sideways across the screen in different directions. A rough screen is very important; the amount of filtering a scrubber can do is proportional to how much the screen can hold on to the algae, without the algae being washed away. Spend some time making every part of the screen super rough, like a cactus:
Tilting the hole-saw will help. Make the first pass in one direction, then do another direction. Repeat on the other side. When roughing the edges, go outwards. Be careful on the other side of the screen, since it will rip more easily than the first side. If you do rip a small piece, the screen will still work fine. Do not ever use a non-roughed screen; the algae will fall right off and you will have no filtering. Now slip the screen into the slot, and attach it with zip-ties wrapped around the pipe:
The bottom of the screen should go into the sump water an inch or so, to keep the flow quiet and bubble-free.
Lights: Attach your lights on both sides, and point them to the middle of the screen. The bulbs should be about 4” (10cm) from the screen. Simple curly-Q spiral CFL (compact fluorescent) bulbs with clip-on sockets work fine; CFL spotlights/floodlights do not work as well because they focus too much light on one spot, and don’t light the surrounding areas enough. Get bulbs that say “warm” or “soft”. Put the bulbs on a timer, so that they are on for 18 hours a day, and off for 6 hours. NEVER let the bulbs run 24 hours, because you will get no filtering. Lastly, a larger screen should have more bulbs, so the screen gets an even amount of light across it:
Now connect your pump (or overflow) to the pipe (the water should flow 24 hours). Don’t worry if the flow is not even from one side of the slot to the other; as the algae grows up and into the slot, the flow will even out. Now, just wait for the growth! You should start seeing improvements in your tank after you have cleaned off about four full screens of algae.
Weekly Cleanings: Every 7 days, you need to turn the flow off and remove the screen from the pipe. Take the screen to your sink, and remove most of the algae while the tap water flows over it. Leave some algae on the screen, so that it can still filter, and so it will grow back quickly. Your first or second week might not grow too much, especially if you are not feeding much (like on a new or cycling tank), but later on it will fill in faster. Also clean the slot with a toothbrush before putting the screen back.
Sometimes, the screen will starting growing dark, slimey algae right away, which looks like oil or tar. This happens when the nitrate and phosphate in your tank are very high. If your scrubber is powerful enough (strong lights, fast flow, and high roughness on the screen), then it may start growing green after a few more days, and be mostly green by the end of the week. But if your scrubber is not powerful enough, and it never starts growing green, then you’ll need to clean the dark stuff off before 7 days. This is because the dark algae block the light from reaching the bottom algae layers. So if the screen stays dark, clean it every 3 days until it starts turning a lighter brown. After that, switch to 5 days until it starts growing green. Once it starts growing green, switch to 7 days from that point on.
The biggest mistake people make when running a new scrubber is not cleaning it every 7 days. If you wait longer than this, too much algae will grow on the screen, and it will block light from reaching the “roots” of the algae. This causes the algae to die and break off, and go into your tank. This doesn’t hurt anything, of course, since it’s just algae, but it still puts nitrate and phosphate back into your tank, which defeats the purpose of the scrubber. So just clean every 7 days and it will be fine.
Growth: When new screens start out, they almost always just have a light brown coating of slimy algae (diatoms). After the first cleaning, and into the second week, it usually gets darker, and by the fourth week and forth cleaning it, can get pretty thick. It’s important to realize that all algae remove nutrients (nitrate and phosphate) from your tank, so any algae that grows on your screen is algae that can’t grow in your tank. As the nutrients in your tank come down, the type of growth on the screen will change. Here are some different types of growth you might experience:
Light Brown Slime: New screens, and sometimes older screens the day after they are cleaned. Perfectly normal.
Black Oil/Tar: Very high nutrients in tank. Screen must be cleaned every 3 days until growth is not so dark. Stronger lights will fix it faster.
Green Spaghetti/Confetti: This is the best type of growth, because the light-green color and open structure allow light and water to penetrate through all parts of the algae.
Also, it is more firm and compact, like a sponge or chaeto, and will not let-go and clog drains easily.
Long Thin Green Hair: This types occurs mostly in freshwater, and filters a lot because the light and flow go throughout the algae. But depending on how you build your scrubber, the strands may get so long they break off or slow down the drain. Adding a bit of Mono Potassium Phosphate to the water, to increase the phosphate, may help fix this and make it growth thicker.
Yellow Rubber or Yellow Slime: Your flow is too low, and is not delivering enough iron to the algae. If you can’t increase the flow, then run the bulbs a few hours less each day. You can also try adding iron to the water, such as Kent’s Iron + Manganese.
Cyano: Your light is too weak.
Big Bald Spot In Middle: Your flow is too low near the light, or you used spotlights instead of spiral bulbs and big reflectors. If you can’t increase the flow, then run the bulbs a few hours less each day. Adding iron may help here too.
Mysteriously Appearing Small Bald Spots: If the growth is thick, but new irregularly shaped bald spots appear each day, then the algae is letting go from the screen. Your screen needs to be rougher. If you can’t do this, then either reduce the flow, or clean more often, so it does not get so thick and heavy.
Types Of Tanks: This DIY simple scrubber is meant to be used in normal sumps which sit under the tank. If you don’t have a sump, or if you have a nano with a “sump” behind the back wall, then it gets more complicated, and will require more research on your part before attempting to build a suitable scrubber.
Size: To determine the size of the screen, and wattage of the bulbs, use these guidelines: The total wattage is the wattage all the bulbs combined . The total area of the screen is width X height, i.e., a screen that is 10 X 10 has an area of 100, not 200. Here are the guidelines:
• Use 0.5 actual (not equivalent) fluorescent watts total per gallon minimum [0.13 watts per liter].
• Use 1.0 actual (not equivalent) fluorescent watts total per gallon for high filtering [0.26 watts per liter].
• Make the screen 1.0 square inches per gallon, with bulbs on both sides (10 x 10 = 100 square inches = 100 gal) [1.64 square cm per liter]
• Flow is 35 gph per inch of slot length [60 lph per cm]. This assumes the slot is 1/8” (3mm) wide.
For more detailed information, or to ask questions, go to AlgaeScrubber.Net. You now have all the info you need to build yourself a super simple and cheap filter, and say goodbye to the nuisance algae in your tank!
Last edited: