blando
Reefing newb
Hey guys i did a 10 gallon sump for my 20 gallon tank i took pics for anyone that might been looking for how to so i tried my best for you guys.
View attachment 15274
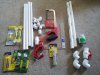
^ here is some things i had to get to do it some stuff you may not need but here are some stuff for example.
View attachment 15275
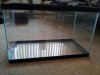
^10 gallon tank DUH! lol
View attachment 15276
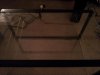
^DO A LAYOUT! Helps when putting your baffles in. All i used to do this is ruler and its a crayon pencil you can get at like Lowes or Home Depot
View attachment 15277
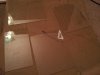
^ i used glass cut outs. Go to Lowes! Home depot does not carry glass anymore at least here they don't went to Lowes they have glass and also cut it for you so go there with messurements.

^ insert first baffle. All depends really on your skimmer. Well at least for mine it did. Make sure to use 100% percent silicone. I got mine from Home Depot and it was actually made for aquariums. Found it in paint section lol.

^insert second baffle. Also takes 24 hours for it to cure. If you wait couple hours you can move on to the next one and so on. This was 8 inches tall i made two of them.

^ insert 3rd baffle this was also 8 inches tall and i put them like 3/4 apart and it was an inch high i believe.

^insert 3rd one and this made it couple inches high from the return pump and make sure have some space in there also for it.

^ after the baffles sit for 24 hours and the silicone has cured test each section one by one and see if there are any leaks. If so dry it out and make sure its dry and add more silcone to it and do it again. I usually added more to the corners and bottoms just because feel like be main place for a leak.

^after all done start connecting your PVC pipes. I used PVC cement to connect them all and also added the skimmer. Test it out make sure there are no leaks. OHHH use ball valves between piping i had one on each side for return and overflow. So then you can adjust the pressure from return and overflow.

^ this is what looks like when finished
Hope you enjoyed and helps who ever that is looking. I do not take full credit for this couple friends on here helped me out so big thanks to them!!
Have any question please ask and ill try to help as much as possible.
View attachment 15274
^ here is some things i had to get to do it some stuff you may not need but here are some stuff for example.
View attachment 15275
^10 gallon tank DUH! lol
View attachment 15276
^DO A LAYOUT! Helps when putting your baffles in. All i used to do this is ruler and its a crayon pencil you can get at like Lowes or Home Depot
View attachment 15277
^ i used glass cut outs. Go to Lowes! Home depot does not carry glass anymore at least here they don't went to Lowes they have glass and also cut it for you so go there with messurements.
^ insert first baffle. All depends really on your skimmer. Well at least for mine it did. Make sure to use 100% percent silicone. I got mine from Home Depot and it was actually made for aquariums. Found it in paint section lol.
^insert second baffle. Also takes 24 hours for it to cure. If you wait couple hours you can move on to the next one and so on. This was 8 inches tall i made two of them.
^ insert 3rd baffle this was also 8 inches tall and i put them like 3/4 apart and it was an inch high i believe.
^insert 3rd one and this made it couple inches high from the return pump and make sure have some space in there also for it.
^ after the baffles sit for 24 hours and the silicone has cured test each section one by one and see if there are any leaks. If so dry it out and make sure its dry and add more silcone to it and do it again. I usually added more to the corners and bottoms just because feel like be main place for a leak.
^after all done start connecting your PVC pipes. I used PVC cement to connect them all and also added the skimmer. Test it out make sure there are no leaks. OHHH use ball valves between piping i had one on each side for return and overflow. So then you can adjust the pressure from return and overflow.
^ this is what looks like when finished
Hope you enjoyed and helps who ever that is looking. I do not take full credit for this couple friends on here helped me out so big thanks to them!!
Have any question please ask and ill try to help as much as possible.
Attachments
Last edited:
