Cathic
Fish Wrangler
Have a small tank? No room for an Overflow? Limited cabinet space?
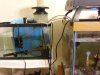
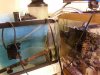
The $60 sump could fix your problems. With the downgrade to my current setup, I found myself having little room on the new BF to fit my protein skimmer heater and powerheads without everything looking cluttered. So I decided for a cheaper either temporary or permanent sump and came up with this idea. THIS WILL NOT BE PERMANENT.
What youll need:
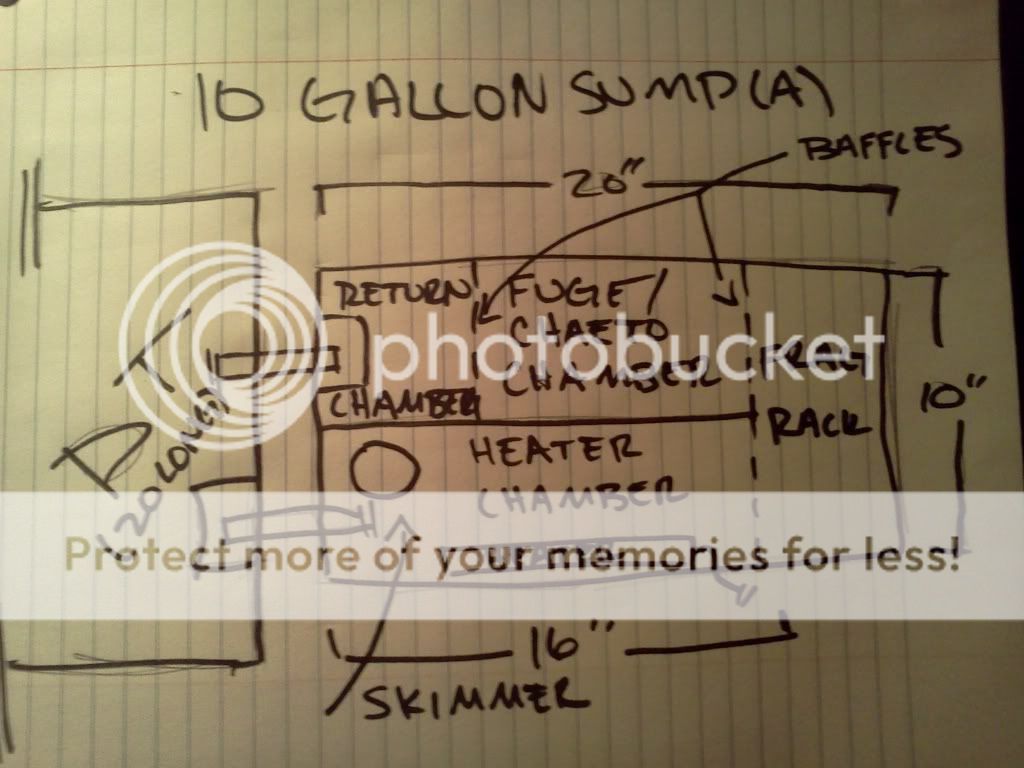
- Sump tank (For this particular setup I would use nothing bigger than a 20g)
- 1/2" ID Vinyl Tubing( Youll need approx 10ft at 36c a foot its relatively cheap)
- 2x Hydor Pico Evolution circulation pump 100's
Want a quick bubble trap? Maybe a place for a sock or other media?
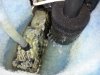
For the bubble trap you can use 1 large sheet of cut to fit filter media around the output of your sump essentially walling it off from the return pump.
For the media or filter sock I found using a clip on frag rack to work.
Now constructing this might seem daunting or setting the pumps equal might worry you have, but no fear! The pico's are easily adjustable to correct flow and by doing two simple things you can ensure that both pump outputs are equal that at the end of the day the difference will be less than the water that evaps from your tank.
To construct simply fit in your skimmer and heater (I even have a spot in my 10g for macros) then fill to the desired level with water - mark this spot with a dry erase pen or something else. Then install the first pump 2 inches under the water on the far side of what will be your return line side to the aquarium. Now install the filter media around the skimmers output and ensure that no areas are open enough to allow bubbles through. Done.
To ensure the pumps are working together at the same rate be sure to cut the tubing into equal lengths and ensure that the pumps are both equally below the water line (lets say two inches).
For this setup the sump cannot sit under the tank, the max head on these pumps is 28in (might be 24in). To modify this to fit for an under tank install you will need the pico 2 or pico 3 circulation pumps and some time to properly plumb.
DISCLAIMERS/THINGS YOU SHOULD KNOW
My tank and sump are level to each other, which allowed for easy pump adjustment with no head to worry about.
I have mine setup in a "safe" way that should one pump push to much or turn off the system will stop working all together. BUILD IN YOUR OWN SAFEGUARD or hmu about what I did.
This should not be intended for use longer than 6 months imo, However, I had an immediate need for a sump and the funding and available materials allowed me to construct this. I know others have sudden "needs" when problems arise and figured I would give my latest frankenstein to those who might benefit.
Edit: Pics shortly for anyone interested.
The $60 sump could fix your problems. With the downgrade to my current setup, I found myself having little room on the new BF to fit my protein skimmer heater and powerheads without everything looking cluttered. So I decided for a cheaper either temporary or permanent sump and came up with this idea. THIS WILL NOT BE PERMANENT.
What youll need:
- Sump tank (For this particular setup I would use nothing bigger than a 20g)
- 1/2" ID Vinyl Tubing( Youll need approx 10ft at 36c a foot its relatively cheap)
- 2x Hydor Pico Evolution circulation pump 100's
Want a quick bubble trap? Maybe a place for a sock or other media?
For the bubble trap you can use 1 large sheet of cut to fit filter media around the output of your sump essentially walling it off from the return pump.
For the media or filter sock I found using a clip on frag rack to work.
Now constructing this might seem daunting or setting the pumps equal might worry you have, but no fear! The pico's are easily adjustable to correct flow and by doing two simple things you can ensure that both pump outputs are equal that at the end of the day the difference will be less than the water that evaps from your tank.
To construct simply fit in your skimmer and heater (I even have a spot in my 10g for macros) then fill to the desired level with water - mark this spot with a dry erase pen or something else. Then install the first pump 2 inches under the water on the far side of what will be your return line side to the aquarium. Now install the filter media around the skimmers output and ensure that no areas are open enough to allow bubbles through. Done.
To ensure the pumps are working together at the same rate be sure to cut the tubing into equal lengths and ensure that the pumps are both equally below the water line (lets say two inches).
For this setup the sump cannot sit under the tank, the max head on these pumps is 28in (might be 24in). To modify this to fit for an under tank install you will need the pico 2 or pico 3 circulation pumps and some time to properly plumb.
DISCLAIMERS/THINGS YOU SHOULD KNOW
My tank and sump are level to each other, which allowed for easy pump adjustment with no head to worry about.
I have mine setup in a "safe" way that should one pump push to much or turn off the system will stop working all together. BUILD IN YOUR OWN SAFEGUARD or hmu about what I did.
This should not be intended for use longer than 6 months imo, However, I had an immediate need for a sump and the funding and available materials allowed me to construct this. I know others have sudden "needs" when problems arise and figured I would give my latest frankenstein to those who might benefit.
Edit: Pics shortly for anyone interested.