DIY overflow box.

chbix

Reefing newb
Well I started making my DIY overflow box. Using both of these sites for reference

Overflow

DIY Overflow Box

Here are a few pics of the progress.

panelslaidout.jpg


Here is my sheet of acrylic laid out with my separate panels


bendingacrylic.jpg


Here is bending the acrylic for the main body. The edge needs some work, ive got better with the saw since then.

bentacrylic.jpg


Here is the main body all bent into shape
overflowsealing2.jpg


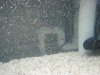
Here is sealing the body to the first side panel...Still gotta find a way to cut it out since I dont have a router.

siphonehose.jpg


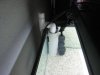
Here is a pic of the top section that will go on to create the siphon. The tube is just standard airline that I sealed into a hole I drilled. Will be connected to a maxi jet 900 I will put in the tank.

So lesson learned. The cheap acrylic cutter at lowes doesnt work for crap. I got a find toothed vinyl saw blade for my circular saw and that works better. Biggest problem is getting the cut straight and even. A table saw would work best but dont have one. I cleaned up some of the nasty edges with a dremel. Luckily I think the silicone will make up for my mistakes.


Also forgot to note that I have a 1" and 3/4" bulkhead on the way, using the 3/4 as the main drain and going to put the 1" in as a failsafe drain.

I have very basic tools for the dremel so I wlll look at lowes and see what i can find.
 
I know they have a router attachment for dremels so that it will be held at a 90 degree angle.

Also, I owuld use the 1" as the main drain and then the 3/4" as the auxilary. Unless you have a reason for doing it the othe way?
 
was thinking the 3/4" will keep the overflow down around 200-300GPH. The the websites referenced stated with a 1" they are getting about 600 gph flow. 600 GPH just seemed way to much for a system that will only have about 70 gallons total
 
You would have been done by now if you'd just drill the tank. $3 hole saw and a pitcher of water. Takes about 2 minutes of your life.

 
I think you should use the 1" as the main drain. It's better to have room for more flow than cut yourself short and not have enough. The recommended flow rate thru a sump is 5-10x the tank volume, so for 70g your looking at 350-700 gph.
 
No. :mrgreen:

The box looks good and I admire the ability to build one on your very first attempt. I'm sure it'll work just fine. It's obvious that you spent the time and did the research to build a properly sized box for your tank. Good job!! :Cheers:

Just next time, drill it. :mrgreen: It's sooooooooooooooo much easier.
 
How did you get the acrylic to bend? Heat it up?? with what??? looks good I built one for my tank but i used pvc to do mine looks like this
 

Attachments

  • overflow.jpg
    overflow.jpg
    15.5 KB · Views: 8,578
  • overflow2.jpg
    overflow2.jpg
    23.5 KB · Views: 2,527
How did you get the acrylic to bend? Heat it up?? with what??? looks good I built one for my tank but i used pvc to do mine looks like this


I marked out where the beds should be and used a propane torch to heat the acrylic. Take off the protective film first, then move the flame back and forth making sure you dont stay in one place cause the acrylic will bubble. the acrylic will bend under its own weight when its ready and then I used 2x4 and clamps to hold it into the bend.

You can also use a heat gun. ALSO WEAR GLOVES! I tested it on a few scrape pieces first, works pretty good.
 
I noticed that you were using some sort of household sealant. Have you tested to make sure that it holds the vacume required for a siphon? I build one along with a sump a few weeks ago and was just wondering if that sealant works for the pressure of the siphon.
 
I noticed that you were using some sort of household sealant. Have you tested to make sure that it holds the vacume required for a siphon? I build one along with a sump a few weeks ago and was just wondering if that sealant works for the pressure of the siphon.


I am using DAP aquarium sealant linked here

Shop DAP 2.8 OZ. Aquarium Sealant Clear at Lowes.com

I havent tested for the vacum holding....hmmmmm might have to make a test box and see.... I would assume it would hold since this is used for making aquariums. Ill test it once ive completed the overflow box. If it holds great, if not ill either redo it using weld on which I know other people have used or say screw it and drill the tank (I know it will make one poster happy :))
 
How did you get the acrylic to bend? Heat it up?? with what??? looks good I built one for my tank but i used pvc to do mine looks like this


I have looked at some of the PVC overflows. For me it came down to the look. My tank will be in the living room/kitchen and I want to make it look good and have as little of the aquarium stuff showing as possible. The main reason I wanted a sump under the tank to hide all the equipment. I almost thought of doing an overflow out of clear PVC, but couldnt find any locally, and then thought what a pain to clean. The clear acrlic overflow allows me to clean pretty easy, and isnt a white piece of PVC sticking into the tank. Plus I wanted to try some acrylic work, my mind is rampid with ideas to try with acrylic once I hone the cutting and shapping part.
 
Ok so my 3/4" and 1" bulk head arrived today!! So question: Do I need a diamond plated hole saw like when you do the holes for glass or will a normal hole saw do ok?

I water tested my first seem and no leaks. I havent had time to work on the overflow or sump in the past few days, but will probably do more thursday.
 
You can use a normal hole saw on acrylic. Just be very carefull when it penetrates all the way. The shock can crack it. You also dont want to put too much preassure on the drill at all. If it catches it can crack the acrylic. I would practice on some scrap pieces until you get the hang of it.
 
Back
Top