You are using an out of date browser. It may not display this or other websites correctly.
You should upgrade or use an alternative browser.
You should upgrade or use an alternative browser.
LilReef's first 60g build
- Thread starter lilreefgirl
- Start date
Bifferwine
I am a girl
Wow very nicely done! That's impressive!
lilreefgirl
Reefing newb
Does anyone know about plumbing??
I've been looking online and through forums, but cant seem to find what I'm looking for.
My display is 60g with three (1 3/4") holes drilled in the centre-back of the tank. Each of the holes will have a 1" double threaded bulkhead.
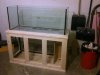
You can see a pic of the sump above. The skimmer section to the left, the refugium in the centre and the return pump (mag9) on the right.
Of the 3 drilled holes, one will have a Durso (already built using this design exactly: Make Your Own Durso Standpipe )
The other holes will be the return and an emergency overflow.
What else do I need to be aware of? Joins/flow/elbows...etc...?
I really would just like to have a picture of a system that is working so I can follow it! :grumble:
I've been looking online and through forums, but cant seem to find what I'm looking for.
My display is 60g with three (1 3/4") holes drilled in the centre-back of the tank. Each of the holes will have a 1" double threaded bulkhead.
You can see a pic of the sump above. The skimmer section to the left, the refugium in the centre and the return pump (mag9) on the right.
Of the 3 drilled holes, one will have a Durso (already built using this design exactly: Make Your Own Durso Standpipe )
The other holes will be the return and an emergency overflow.
What else do I need to be aware of? Joins/flow/elbows...etc...?
I really would just like to have a picture of a system that is working so I can follow it! :grumble:
lilreefgirl
Reefing newb
So, it's been a while since I updated - so here goes...
Not much to report, but I have most of the plumbing parts, no overflow box yet. I was going to make my own, but the local glass store didnt have what I needed, and the price was too expensive to order in.
I will be ordering the overflow box from an lfs that is about an hour away. :(
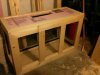
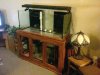
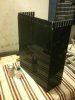
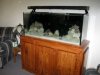
The stand was looking a bit boring to me, so I added some trim. Here's an updated pic.
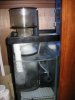
I built a small box on the right side to put some of the electrical so there's a barrier between that and the sump.
The doors are not finished yet, still need sanding.
Staining tomorrow (if not, by the weekend at the latest!)
Not much to report, but I have most of the plumbing parts, no overflow box yet. I was going to make my own, but the local glass store didnt have what I needed, and the price was too expensive to order in.
I will be ordering the overflow box from an lfs that is about an hour away. :(
The stand was looking a bit boring to me, so I added some trim. Here's an updated pic.
I built a small box on the right side to put some of the electrical so there's a barrier between that and the sump.
The doors are not finished yet, still need sanding.
Staining tomorrow (if not, by the weekend at the latest!)
Attachments
lilreefgirl
Reefing newb
Update!!
Oh, I've been busy!
Since my last post, I have unfortunately lost my female ocellaris to disease.
I also added and lost a gold-headed goby (hannibal)...not sure what happened, he disappeared, I found him hiding and then 3 days later, he was again nowhere to be found. that was about 2 weeks ago. I think he was being bullied by my algae blenny...that guy looks unassuming, but Ive caught him attacking snails.
Anyway, on to the build.
The stand is finished, stained and doors will go on once the plumbing is finished (so I dont ding them while working away)
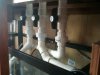
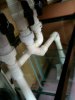
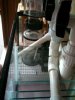
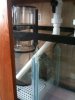
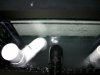
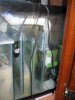
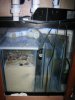
I have added some pictures of my ghetto attempt at plumbing. I have no idea what I'm doing when it comes to plumbing, but this is what Ive got.
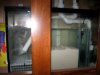
(in the first pic (left to right)
1 - primary overflow (durso) - ball valve, union, 45 degree elbow to the skimmer chamber (Euro Reef RS 100)
2 - return - ball valve, union, 2-45 degree elbows & 1-90 degree elbow to the mag 9.5
3 - emergency overflow - ball valve, union, 2-90 degree elbows to the skimmer chamber (open above the water level so it will be loud if water runs through it)
That's the set up - if anyone can see if this will or will not work, please let me know - any assistance here would be greatly appreciated!!
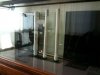
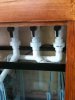
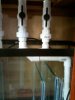
In the second picture, as you can see (from left to right again)
1 - durso standpipe
2 - return - I currently have just a 1" pvc there, because I am unsure how I am/can direct the flow. I would like to put a tee at the top so that I can direct the flow to both sides of the tank, but I am not sure whether that will reduce the flow too much??? I also dont know if I should have it come over the top of the overflow box & if so what parts I'll need. I considered doing the tee and have it exit through the sides of the overflow box - but I would have to use flexible hose to do this because of the positioning - and I am not sure if that is a good idea...?? Im kinda stumped on that one)
3 - emergency overflow - again I just have a 1" pvc there. I thought I should have a 1 1/4 pvc, but the bulkhead is only 1" anyway - so I dont think it matters?? It also needs to be trimmed to the proper height.
feedback welcome!!!
Oh, I've been busy!
Since my last post, I have unfortunately lost my female ocellaris to disease.
I also added and lost a gold-headed goby (hannibal)...not sure what happened, he disappeared, I found him hiding and then 3 days later, he was again nowhere to be found. that was about 2 weeks ago. I think he was being bullied by my algae blenny...that guy looks unassuming, but Ive caught him attacking snails.
Anyway, on to the build.
The stand is finished, stained and doors will go on once the plumbing is finished (so I dont ding them while working away)
I have added some pictures of my ghetto attempt at plumbing. I have no idea what I'm doing when it comes to plumbing, but this is what Ive got.
(in the first pic (left to right)
1 - primary overflow (durso) - ball valve, union, 45 degree elbow to the skimmer chamber (Euro Reef RS 100)
2 - return - ball valve, union, 2-45 degree elbows & 1-90 degree elbow to the mag 9.5
3 - emergency overflow - ball valve, union, 2-90 degree elbows to the skimmer chamber (open above the water level so it will be loud if water runs through it)
That's the set up - if anyone can see if this will or will not work, please let me know - any assistance here would be greatly appreciated!!
In the second picture, as you can see (from left to right again)
1 - durso standpipe
2 - return - I currently have just a 1" pvc there, because I am unsure how I am/can direct the flow. I would like to put a tee at the top so that I can direct the flow to both sides of the tank, but I am not sure whether that will reduce the flow too much??? I also dont know if I should have it come over the top of the overflow box & if so what parts I'll need. I considered doing the tee and have it exit through the sides of the overflow box - but I would have to use flexible hose to do this because of the positioning - and I am not sure if that is a good idea...?? Im kinda stumped on that one)
3 - emergency overflow - again I just have a 1" pvc there. I thought I should have a 1 1/4 pvc, but the bulkhead is only 1" anyway - so I dont think it matters?? It also needs to be trimmed to the proper height.
feedback welcome!!!
Last edited:
lilreefgirl
Reefing newb
lilreefgirl
Reefing newb

dcantucson
Reef pro
:^::bowdown: Awesome plumbing job. :bowdown::^:
lilreefgirl
Reefing newb
:^::bowdown: Awesome plumbing job. :bowdown::^:
so you think that will work???
Any thoughts on the return/overflow box questions?
Bifferwine
I am a girl
See if your LFS carries Loc-Line. It screws right into standard PVC fittings. Looks great!

lilreefgirl
Reefing newb
I'm actually ordering that online. I just dont know if it should come OUT of the overflow box, or OVER it..? Do you know if it fits into the 1" pvc, or do I need some kind of connector?? The site I am ordering it from is not 100% clear...See if your LFS carries Loc-Line. It screws right into standard PVC fittings. Looks great!
Bifferwine
I am a girl
Some overflows have a hole drilled in the side for the Loc Line to come out of. My overflow doesn't, so I cut a few of the teeth out and put the Loc Line where the teeth used to be.
It doesn't fit directly on to the 1" PVC. But you can get the adapter it fits into at any hardware store; it's a standard PVC fitting.
It doesn't fit directly on to the 1" PVC. But you can get the adapter it fits into at any hardware store; it's a standard PVC fitting.
lilreefgirl
Reefing newb
sweet, thanks Biff!
lilreefgirl
Reefing newb
Im stuck again
I am building an internal overflow box. my tank is 19 1/4 tall. I cant seem to find out how tall the overflow box itself should be, and how deep to cut the teeth in it.
Now, keep in mind that I have a rimless tank (no black band at the top) so I dont want the water level to be too low and look dumb.
Are there some standard guidelines somewhere? I cant seem to find much on internal overflows, much less - the specifications!
Thanks!
BL1
.............
The instructions that glass-holes gives you to install their internal overflow boxes can be found here Installation GH
I can't find you the exact parts you would need because I can't open that site on my phone but, I think it's about 1/2 down the page. Hopefully it helps.
I can't find you the exact parts you would need because I can't open that site on my phone but, I think it's about 1/2 down the page. Hopefully it helps.
lilreefgirl
Reefing newb
thanks Brian,
Here's what it says:
"Here’s what to do with all this stuff:
1. Determine the water level you wish to run. We find with typical applications within our recommended flow rates the water level in our boxes will be just over ½ to ¾ of the way up the teeth. If you are using a toothless (Grandpa style) box plan on the water level running ½” to ?” higher than the box. "
sounds like my first thought of 1/4" lower than the tank rim will NOT work!! Thanks for this (tragedy averted!!)
BL1
.............
You're welcome :)
lilreefgirl
Reefing newb
November 28, 2010 - Update
So I have been working away and the "build" is finished!!
Since the last post, I have:
-built the internal overflow box (some teeth are a bit crooked, but not noticeable) I made all cuts using my router - worked like a charm!
-completed the plumbing
-installed the doors
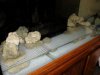
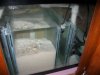
-placed egg crate on the bottom glass & placed some of the base live rock and started on basic aquascaping - only the cave (left) and the tunnel (right) are permanent and have been secured together with reef-safe putty - I have other LR to add later.
-sand and water added to both DT and Sump - waited for the "dust to settle", and voila! Done!
Now, the only problems I encountered with the final set up is that the lights I bought (used) dont work as they should (only one ballast is working). I plugged in my skimmer only to find out - the pump motor was seized (used) - I am in the process of trying to get the magnet out so I can replace it (not fun!)
So here I am! Just waiting for it to cycle - which shouldnt take too long Im hoping!
So I have been working away and the "build" is finished!!
Since the last post, I have:
-built the internal overflow box (some teeth are a bit crooked, but not noticeable) I made all cuts using my router - worked like a charm!
-completed the plumbing
-installed the doors
-placed egg crate on the bottom glass & placed some of the base live rock and started on basic aquascaping - only the cave (left) and the tunnel (right) are permanent and have been secured together with reef-safe putty - I have other LR to add later.
-sand and water added to both DT and Sump - waited for the "dust to settle", and voila! Done!
Now, the only problems I encountered with the final set up is that the lights I bought (used) dont work as they should (only one ballast is working). I plugged in my skimmer only to find out - the pump motor was seized (used) - I am in the process of trying to get the magnet out so I can replace it (not fun!)
So here I am! Just waiting for it to cycle - which shouldnt take too long Im hoping!
Attachments
-
 sump Nov28.jpg30.6 KB · Views: 276
 -
 sandstorm.jpg22.5 KB · Views: 259
 -
 LR on egg crate.jpg32.2 KB · Views: 271
 -
 overflow plumbing.jpg28.2 KB · Views: 272
 -
 overflow2.jpg26.3 KB · Views: 280
 -
 starting to clear.jpg31.1 KB · Views: 292
 -
 sum Nov28-3.jpg32.3 KB · Views: 270
 -
 sump Nov28-2.jpg21.3 KB · Views: 262
 -
 pump parts.jpg31.2 KB · Views: 258
 -
 latest-nov 28.jpg33.7 KB · Views: 274
lilreefgirl
Reefing newb
Hello all!
I hope everyone had a great Christmas!!
So update to the build - it's finished!!!! :^:
I had to redo the sump and space out the baffles to get rid of some micro bubbles that were happening. The tank cycled quickly (thanks to cured LR I think)
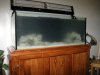
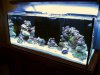
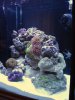
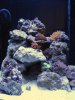
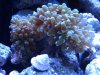
The tank looks pretty good to me!
Here are the newest pics of tank/sump/inhabitants. Enjoy! :D
I hope everyone had a great Christmas!!
So update to the build - it's finished!!!! :^:
I had to redo the sump and space out the baffles to get rid of some micro bubbles that were happening. The tank cycled quickly (thanks to cured LR I think)
The tank looks pretty good to me!
Here are the newest pics of tank/sump/inhabitants. Enjoy! :D
Attachments
-
 Dec 2010 - 5.jpg26.8 KB · Views: 293
 -
 Dec 2010 - 4.jpg24.4 KB · Views: 287
 -
 Dec 2010 - 3.jpg24.4 KB · Views: 254
 -
 Dec 2010 - 1.jpg23.8 KB · Views: 255
 -
 full tank pic dec 2010.jpg51.9 KB · Views: 266
 -
 Dec 2010 - 6.jpg31.7 KB · Views: 278
 -
 Dec 2010 - 7.jpg33.6 KB · Views: 263
 -
 Dec 2010 - 8.jpg36.6 KB · Views: 265
 -
 dec 2010-9.jpg58.3 KB · Views: 282
 -
 dec 2010-7.jpg34.5 KB · Views: 292
PRC
Stop Quoting Me!
Tank looks fantastic!. You did a great job on the tank and the rockwork.