planbtypea
Reefing newb
So I decided that I am unhappy with my current sump for my 125g. It is a 30g with ASM Skimmer->DSB->Polly fiber/Chem(as needed)->Return. I decided to go the DIY way, no funds for a $300-600 sump. I have already had a few attempts at building sumps before. Built one for a 35g freshwater and one for my brother-in-laws 75g reef. The idea was to go as big as the budget would allow, which wasnt much at the time. Had been surfing craigslist for a 50+ but was not finding anything that anyone would not sell as a full setup for $500+:frustrat:.
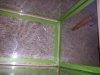
Fast forward 2 weeks, happened to walk into the local Goodwill looking for something with my better half (dont remember what she wanted). As we walked in, there it was, 50g terarium/aquarium. Looked it over, all seams were good, no cracks and price....$25!
Somehow managed to get it into the Mazda and got it home. :bounce:
I will be keeping everyone up to date on the build as it happens. Might take a little bit as I am a paramedic working 72-96 hours a week...
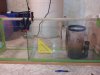
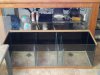
Here is the plan for the general layout of the sump. I do have more detailed hand drawn pictures/plans but dont want to make it too complicated from the start (drafting background)...
Fast forward 2 weeks, happened to walk into the local Goodwill looking for something with my better half (dont remember what she wanted). As we walked in, there it was, 50g terarium/aquarium. Looked it over, all seams were good, no cracks and price....$25!
Somehow managed to get it into the Mazda and got it home. :bounce:
I will be keeping everyone up to date on the build as it happens. Might take a little bit as I am a paramedic working 72-96 hours a week...
Here is the plan for the general layout of the sump. I do have more detailed hand drawn pictures/plans but dont want to make it too complicated from the start (drafting background)...