You are using an out of date browser. It may not display this or other websites correctly.
You should upgrade or use an alternative browser.
You should upgrade or use an alternative browser.
Rcpilot - 29g Frag Tank
- Thread starter Rcpilot
- Start date
Rcpilot
Reef enthusiast
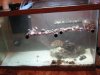
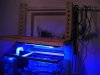
I'm beginning to wonder about acclimating the corals to the new lights. The existing PC fixture has (6) 13w bulbs - so 78w. Currently, all the coral racks are up high near the surface of the water. The new canopy is going to have the 175w MH and dual 65w PC actinics.
Yote says to keep the bulbs 12" - 13" above the water. I'm not sure I can get the lights that high. That would mean my canopy would have to be at least 12" tall and probably more like 14" tall. Thats a BIG canopy for a 29g tank.
I was hoping to make the canopy about 10" tall and put the lights in the top. By the time I build brackets, mount them.. etc - probably have the lights 8" above the water.
I'm thinking my corals need to get moved to the bottom of the tank now.
tankedchemist
Reef enthusiast
Thanks Ryan. Thats really cool of you to offer. I think I have all the parts I need though.
I bought a 2x PC 65w retrofit kit from Catalina. Bulbs, individual reflectors, ballasts etc.. I also have a 175w MH ballast, bulb and mogul but no reflector. And I've got about 3 square feet of polished aluminum in a box. I'm going to try and use pop rivets and a small sheet metal brake to make my own reflector.
I just need some wood for the canopy and a set of drawer slides. I probably need miscellaneous wiring junk, but that's easy to get. I'm also working on my electronic auto top off thingy with my RO unit and sump. I might just buy a 12v power supply that's big enough to run all the relays and switches for the auto top off AND the cooling fans that I'm installing in the canopy. They all run on 12v DC so why not power them all with one power supply? Just need to add up the watts and do the math to make sure I buy a big enough power supply. 2 amps is probably more than enough. I'd rather do it all in one big project box if possible.
Details on the auto top off system, when you do it... please please please. I'm not smart enough to figure that kinda crap out, but I want to build a better one than I've got.
As for the light spacing... 8" could be ok, but you may want to plan for a pair of fans to blow cool air in and hot air out, just in case. Better than having to redo the canopy later, imo. I'd move the corals right before you put the new lights in, but you're right that they'll need to go down to the bottom.
AlwaysImproving
Reefing newb
Nice looking setup RC. I especially like your diy sump and Ill buy some zoa colonies off of ya when you decide to sell them :)
Rcpilot
Reef enthusiast
Ted
Living one day at a time
so is that a 20k bulb?
Bifferwine
I am a girl
Ummmm hahahahahahahahaha!!!!!!!!!!!!!!!!!!!!!!!!!
Rcpilot
Reef enthusiast
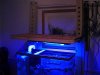
It's not as blue when you're standing here. Ya know how cameras screw up the light...
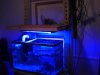
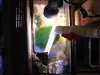
But it's BLUE alright. I am using (2) 65w PC bulbs. One is true actinic and the other is 460nm. Then there's the 14K MH - 175w. 305 watts total.
It's been running about 2 weeks. The corals look out of this world. All the colors have turned deeper and richer - more depth and texture. Ridges look more pronounced. Even the color in the tentacles is different - deeper.
It's going to be hard to sell corals though. People/buyers often think pictures like this are photoshopped or taken under 100% actinic lighting.
Attachments


Smitty
Reef pro
Those lights are very "Blue" like you said, but the corals look fantastic!
Rcpilot
Reef enthusiast
I kinda wish the MH was 12K or 11K instead. They're cheap - they ship from Canada, but I think they are probably manufactured in China. $20 shipped. It's probably worth it to buy a 12k bulb and see how it looks. I want good growth and color.
I'll probably run this setup for 6 months and see how the corals do. Still trying to get away cheap on this whole setup. The darn oak dowels -- 1" diameter are $5 apiece and I had to buy 3 of them. :grumble: The rest of it is a 3/4" plywood top, 1x2 lumber, wood glue and some 2" drywall screws. The lumber, glue, screws etc to make the light and light stand was about $50.
EDIT:
I think it's time for the picture to find some new real estate.
Hiker4twenty
Reef enthusiast
Those corals look nice Chris! Hopefully the new light works out well for you. Who makes it?
Rcpilot
Reef enthusiast
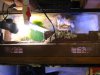
The MH bulb is some knock-off --- no-name thing I bought off ebay. The MH ballast is an old SeaLife. It's a magnetic ballast circa 1990 +/-. The PC lighting is from used parts and pieces I scrounged up over the last couple years. Ballast here and a wiring harness there - couple reflectors from this place over here and some bulbs from that other cheap place over there.
I just scrounged and saved pieces here and there - bought most of the pieces stupid cheap - until I had all the parts. Then it took me 6 months to get off my ass and build the whole thing into a functional light fixture. It ain't pretty, but it works. It's for a frag tank, so I care little about aesthetics and much about functionality. :mrgreen:
I just scrounged and saved pieces here and there - bought most of the pieces stupid cheap - until I had all the parts. Then it took me 6 months to get off my ass and build the whole thing into a functional light fixture. It ain't pretty, but it works. It's for a frag tank, so I care little about aesthetics and much about functionality. :mrgreen:
Last edited:
yote
In Memoriam
Rc,How does it look with just the MH burning?
Everybody that burns 20K bulbs that I know,dont use actinics.And I think that the MH alone is plenty of light for your corals.
Everybody that burns 20K bulbs that I know,dont use actinics.And I think that the MH alone is plenty of light for your corals.
Rcpilot
Reef enthusiast
Never tried it without the PC lights. I will do that today and take some pics with just the MH light.
Rcpilot
Reef enthusiast
Just got a new bag of Biffs cheato in the mail this week. I've been needing to do something with my refugium because there were some problems with the lighting and drain bulk head that leads to my sump.
The tank hood is an old T8 low output fluorescent (15w) that I've removed the front door on. It's slid as far forward as possible to clear the PVC pipe. I think it's Oceanic or Perfecto brand - el cheapo. I could redo the PVC pipe and make it all slick - but at some point ya just gotta acknowledge that you're friggin' lazy - and deal with it. I'm too lazy. :mrgreen:
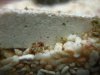
The 3/4" PVC tube used to dump straight down and make a TON of bubbles and salt creep in this area. I had no place else to clamp the light, so I needed to get rid of the bubbles in this area, as well as protect the cheato from finding my unprotected drain bulk head and clogging it. I installed the 90* elbow and about 16" of pipe. That dumps the water out way over on the other side of the fuge. No more bubbles to risk popping the bulb on the spotlight. It's a little 25w R14 bulb.
I rearranged some of the live rock in the fuge and made a sorta wall that divides the 2 ends of the tank. Now the new cheato and the old cheato are pinned on that end of the tank. The new water dumps into the front corner and the bulk head is in the back corner.
Hopefully a nice improvement to my old arrangement. The last pic is a drawing of what it looks like now when viewed from the top. The plastic cover is omitted for clarity.
The tank hood is an old T8 low output fluorescent (15w) that I've removed the front door on. It's slid as far forward as possible to clear the PVC pipe. I think it's Oceanic or Perfecto brand - el cheapo. I could redo the PVC pipe and make it all slick - but at some point ya just gotta acknowledge that you're friggin' lazy - and deal with it. I'm too lazy. :mrgreen:
The 3/4" PVC tube used to dump straight down and make a TON of bubbles and salt creep in this area. I had no place else to clamp the light, so I needed to get rid of the bubbles in this area, as well as protect the cheato from finding my unprotected drain bulk head and clogging it. I installed the 90* elbow and about 16" of pipe. That dumps the water out way over on the other side of the fuge. No more bubbles to risk popping the bulb on the spotlight. It's a little 25w R14 bulb.
I rearranged some of the live rock in the fuge and made a sorta wall that divides the 2 ends of the tank. Now the new cheato and the old cheato are pinned on that end of the tank. The new water dumps into the front corner and the bulk head is in the back corner.
Hopefully a nice improvement to my old arrangement. The last pic is a drawing of what it looks like now when viewed from the top. The plastic cover is omitted for clarity.
Attachments

Last edited:
Ted
Living one day at a time
Looks good RC hows it working for you?
Rcpilot
Reef enthusiast
Sorry for the delay - I should probably subscribe to my own thread. :shock:
It's working really well. Biffs cheato is growing well and my original cheato - that was dying - is now growing too. It was just a combination of enough light and the right spectrum. I changed the 15w fluorescent tube out to a 6500K and the little 25w spotlight is probably closer to 3500k. Perfect color to make algae grow. :mrgreen:
It's working really well. Biffs cheato is growing well and my original cheato - that was dying - is now growing too. It was just a combination of enough light and the right spectrum. I changed the 15w fluorescent tube out to a 6500K and the little 25w spotlight is probably closer to 3500k. Perfect color to make algae grow. :mrgreen:
daugherty
part time reefer
that is good to hear that it is growing well for you. i need to get some i think
Similar threads
- Replies
- 0
- Views
- 2K