zoot098's tank

ZOOT098

Reefing newb
well ive asked many questions, im not done asking them either im sure
so i thought i would post some pics of my journey so far
the last few pics are from this morning 4/28/08
thanks for all the advice so far

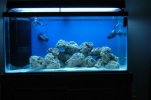
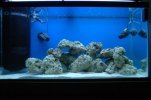
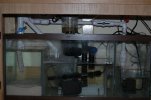
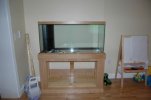
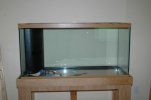
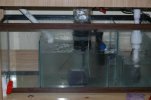
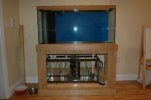
the tank is a 90 gallon corner overflow
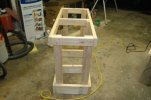
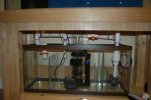
home-made sump system
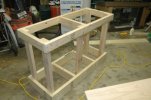
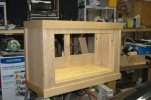
home- made stand
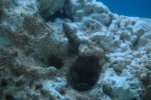
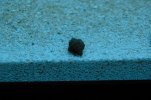
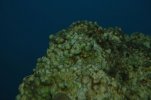
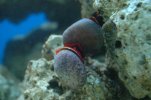
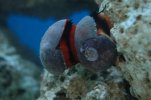
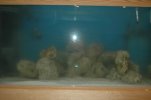
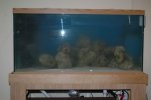
90 pounds of figi live rock
80 pounds of live sand

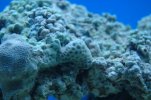
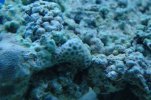
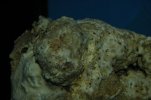
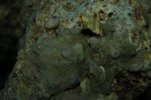
the last two pics are something i noticed on my rock after i blew all the settled dust of of them, dont know what it is but it looks kind of cool
 

Attachments

  • DSC_0022.JPG
    DSC_0022.JPG
    25 KB · Views: 288
  • DSC_0023.JPG
    DSC_0023.JPG
    23.4 KB · Views: 297
  • DSC_0052.JPG
    DSC_0052.JPG
    25 KB · Views: 300
  • DSC_0063.JPG
    DSC_0063.JPG
    14.4 KB · Views: 280
  • DSC_0064.JPG
    DSC_0064.JPG
    11.9 KB · Views: 301
  • DSC_0103.JPG
    DSC_0103.JPG
    11.4 KB · Views: 295
  • DSC_0102.JPG
    DSC_0102.JPG
    19.8 KB · Views: 304
  • DSC_0101.JPG
    DSC_0101.JPG
    14.4 KB · Views: 306
  • DSC_0100.JPG
    DSC_0100.JPG
    16.3 KB · Views: 317
  • DSC_0093.JPG
    DSC_0093.JPG
    21.2 KB · Views: 315
here are the rest of the pics
 

Attachments

  • DSC_0110.JPG
    DSC_0110.JPG
    26.8 KB · Views: 301
  • DSC_0109.JPG
    DSC_0109.JPG
    29.5 KB · Views: 309
  • DSC_0108.JPG
    DSC_0108.JPG
    17.5 KB · Views: 309
  • DSC_0107.JPG
    DSC_0107.JPG
    19.3 KB · Views: 310
Looks like a great start, sanitary plumbing too! I dig it. Whats they dry cell in you sump? Eventually a fuge?
 
thanks for all the compliments

i thought i should post a pic of my sump as it is now

i changed all the 90's in the drain line to 45's which helped with my flow

i also went with a smaller pump, i ran a 3/4" line out of it and into a 1" line after the ball valve it is running wide open now

the drain is split with a wye and a ball valve to control flow into the refugium on the right

the water just trickles into the fuge and then spills into the center chamber
there is nothing in the fuge right now except 20 pounds of live sand

i raised the skimmer about 2" with some eggcrate and it seems to be operating much better
 

Attachments

  • DSC_0039-1.JPG
    DSC_0039-1.JPG
    39.5 KB · Views: 310
Can tell you took some time to do some researching and planning before just jumping in. Your doing real well. I like your clean, detailed work but I personally do not like "reef ready" tanks ( overflows holes are too small and the towers are to large). They are so small power heads become a necessity and not a choice. Even as a reef ready tank with the power heads needed for circulation, it is one of the better to best looking jobs I have seen for quite a while. It is easy to see your another person who really enjoys the set up portions of reefing. I myself love design and set ups.
 
Last edited:
thanks fatman, i did do quite a bit of research first, and asked a ton of questions

i agree with you on the size of the holes on my tank, if i did it over i would build my own overflows, but it turned out good for my first attempt

fishfan i dont know what you mean by my skimmer running wet????????
 
I think he means you skimmer collection cup, it looks like it's "spraying" water inside it but i think it's just and illusion from the bubbles it's pushing into it, the water it's collected looks fairly yucky.
 
the skimmer collection cup looks wet because i rinsed it out and didnt bother drying it, its actually leaching bubbles up and over just like it should
 
Running dry is to have your bubbles spend longer in the skimmer reactiom chamber before they rise up into the collection cup. That produces a stiff skimmate with almost no water, running wet is the opposite. The bubbles spend less time in the reaction chamber and are wetter when they enter the collection cup. Dialing a skimmer up or down, meaning, providing wetter or drier skimmate, depends on the brand as to how it is done.
 
first signs of life

third week since adding water
 

Attachments

  • DSC_0232.JPG
    DSC_0232.JPG
    44.4 KB · Views: 266
  • DSC_0231.JPG
    DSC_0231.JPG
    47.7 KB · Views: 255
  • DSC_0125.JPG
    DSC_0125.JPG
    29.2 KB · Views: 252
  • DSC_0124.JPG
    DSC_0124.JPG
    34.3 KB · Views: 260
  • DSC_0126.JPG
    DSC_0126.JPG
    39.7 KB · Views: 267
  • DSC_0251.JPG
    DSC_0251.JPG
    35.9 KB · Views: 256
  • DSC_0252-1.JPG
    DSC_0252-1.JPG
    38.4 KB · Views: 276
  • DSC_0254.JPG
    DSC_0254.JPG
    33 KB · Views: 264
Back
Top