jrothma's 225 (re)build

jrothma

Reefing newb
I hope this is the right place to post, if not, I could move to the newbie forum.

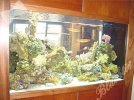
Recently bought a house with a 225 tank built-in, but basically nothing but the tank left in place. I'll attach a photo I found of the tank set up in 2002 when the house was originally built.

When originally set up, it was originally run to a small sump sitting on a shelf in the basement. Oh yeah..... I haven't mentioned that the tank is built into a wall/cabinet and there's no room for equipment except in the basement.

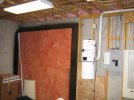
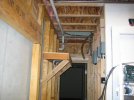
In my opinion, the existing shelf was unacceptable both for the size of sump/refugium and terrible access for service.

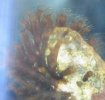
I bought an existing 125 tank with sump that came with about 200lbs of live rock, coral/shell media for the bottom, and some hermit crabs. It also has good lights built into a hood, but the wiring is a mess and it currently doesn't work.

Here are some photos of the situation and what I've accomplished so far. Will post more later and look forward to your thoughts, suggestions, and mostly advice!

Joe
 

Attachments

  • fish tank.jpg
    fish tank.jpg
    24 KB · Views: 353
  • empty tank.jpg
    empty tank.jpg
    24.6 KB · Views: 349
  • basement before.jpg
    basement before.jpg
    44.4 KB · Views: 383
  • shelf.jpg
    shelf.jpg
    44.5 KB · Views: 363
  • fish room after.jpg
    fish room after.jpg
    47.1 KB · Views: 384
That is an awesome set up that you have acquired! That is a dream set up for many of us very very cool for you, Im jealous.
 
Thanks very much. We're pretty excited about the house and the eventual tank that will be the centerpiece of the home. I've had freshwater tanks in the past, but saltwater is an entirely new experience.

Next project is plumbing. Fun fun! The existing lines you can see to the right of the shelf in the photo are about 22' from the 125g that I'm planning to use as the sump/refugium. The other challenge is that the line from the overflow out of the upstairs tank is 1.25"ID. The line going up to the tank is only 3/4"ID.

I'd sure appreciate your thoughts, but I'm thinking of adding an additional 3/4" line up to the tank. I picked up a slightly used Hammerhead pump which should provide as much volume as needed, just not sure if the two 3/4" inputs will be a decent match to the one 1.25" output from the main tank.

The other thing I'd love some input on is converting the 125 to sump/refugium status. Thinking I can just cut down (or off) the pipes currently running from the tank to the sump and plumb that water to the pump. Thought was also to cut down the dividers (sorry, I don't know the proper term) in the corners to whatever height the water level should be. Not sure how to properly set up the big area. The main tank water can easily be plumbed to dump in the end nearest the wall, but I'm kind-of at a loss from there.

Hope this isn't too many questions....

What do you think about keeping the current sump running with just one input and one output using the existing bulkheads currently used for returning water to the tank. It would be easy to put the equipment under the cabinet or the sink for make up water, reactor, stirrer, etc. into the existing sump.

Thanks very much for your thoughts!

Joe
 
Last edited:
Let's see, I'll try to answer some of your questions!

The existing lines you can see to the right of the shelf in the photo are about 22' from the 125g that I'm planning to use as the sump/refugium. The other challenge is that the line from the overflow out of the upstairs tank is 1.25"ID. The line going up to the tank is only 3/4"ID.

That's not a problem. Usually the two sets of lines are different sizes.

I'd sure appreciate your thoughts, but I'm thinking of adding an additional 3/4" line up to the tank. I picked up a slightly used Hammerhead pump which should provide as much volume as needed, just not sure if the two 3/4" inputs will be a decent match to the one 1.25" output from the main tank.

You don't have to "match" them. The pump is moving water back up to the tank. That water is going over your overflows, and going back down to the sump. The water can only go down to the sump as fast as your pump is moving it back up.

The other thing I'd love some input on is converting the 125 to sump/refugium status. Thinking I can just cut down (or off) the pipes currently running from the tank to the sump and plumb that water to the pump. Thought was also to cut down the dividers (sorry, I don't know the proper term) in the corners to whatever height the water level should be. Not sure how to properly set up the big area. The main tank water can easily be plumbed to dump in the end nearest the wall, but I'm kind-of at a loss from there.

Huh?? I got lost on that one. Sorry :)

What do you think about keeping the current sump running with just one input and one output using the existing bulkheads currently used for returning water to the tank. It would be easy to put the equipment under the cabinet or the sink for make up water, reactor, stirrer, etc. into the existing sump.

You can convert the existing sump into a sump/fuge without changing any of your plumbing. Most people have their sumps/fuges in the same tank, and only use one return pump. You would need to divide the sump into 3 compartments using plexiglass baffles. One for your equipment (skimmer, heater, etc). One for the fuge, and one for the return pump. The most common way is in this order: equipment | fuge | return, but some people do it this way too: equipment | return | fuge. Doing it the second way allows you more control over the flow rate in the fuge.
 
Thanks Sarah, I'll try to explain better:

What I'm thinking of doing is using the current 125 in the basement as the new sump and either getting rid of the smaller sump or using it secondarily. I hope that makes sense.

The 125 is already bottom drilled with two large and two small holes. The big holes are currently used for water running from the tank to the sump and the smaller ones are for the water running from the sump, up over the overflow "panel" thing and into the 125 tank.

In order to get the volume and lift needed to reach the 225 tank, a large external pump is needed. I figured plumbing that to the existing larger outputs from the 125 would be a lot easier than the idea of trying to drill the existing sump.

The overflows (duh) in each corner of the 125 are obviously almost the full height of the tank. If I want to use the 125 as the sump, I would cut down those overflows to whatever height wanted for the sump water level.

The challenge lies in designing the sump to use the existing holes in the 125 for water into the pump. It would be much easier to just close off the hole in one corner and drain from just the opposite corner. Then we could build the dividers from one end of the sump/fuge as you describe. Again, I'm unsure if the volume from just one of these holes would be sufficient for the volume of water we want to return to the 225 per hour.

Any engineers in the house?

Thanks again,

Joe


Update, pump, hydroids? and algae

Not much progress this week with other projects going in the new house (home theater projector and screen go in this week!)

Tested the used Hammerhead pump to find it was seized. The previous owner probably never cleaned or even rinsed it when he took his tank down. I capped the intake and filled the pump with a solution of water and vinegar. Lots of bubbles and a few hours later, the pump spins easily!

Being totally ignorant when I bought the 125 and rocks, I didn't know what the little tubular things were on the rock. If anything, I figured they were long dead. WRONG! starting about a week ago, the top of some of these showed a little white tuft at the top. By Friday, you could see "tentacles" out the top. I'm 90% sure they are hydroids, but don't know if they should stay or go. Your thoughts???

The rock is beginning to grow a bit of hairy looking algae. I'm turning off the lights for a few days to see if if is reduced. The hermit crabs sure have plenty to eat now!

Only spent money on the tank this week, no real progress. Just picked up a bunch of schedule 40 pipe, connectors, ball valves, etc. Trying to get a carpenter out to remove the faces on the tank cabinets. It will be a LOT easier to run plumbing and electric with that access. Also plan to make them easily removable with snap-loc tape or magnets so we can easily get access in the future.

That's all for this week. Please give opinions on the hydroids (assuming they are hydroids!).

Thanks,

Joe
 

Attachments

  • hydroids.jpg
    hydroids.jpg
    23.4 KB · Views: 309
  • pump after.jpg
    pump after.jpg
    21.7 KB · Views: 294
  • pump before.jpg
    pump before.jpg
    27.7 KB · Views: 318
They look like hydroids and they should definitely go. If they are all concentrated on one rock, the best way to get rid of them would be to remove the one rock and boil it (if it's small enough). That will kill anything on it, but you have enough other rock to re-seed that one piece. Short of doing that, hydroids are very hard to kill.
 
Your going to have a great setup once you have the time to tackle it. I will be watching this thread closely as one day we hope to do a built in.
 
I'd call em hydroids.I'd just sit that rock outside in a bucket of fresh water for 5 or 6 weeks.If that dont kill em,nothings going to.
 
Manually removed most of the hydroids yesterday. (See photo) There were several clumps on two separate very nice rocks that I didn't want to totally kill off yet. If they come back with a vengeance, it will have to be done, I suppose.

Thinking of Sarah's idea of boiling them, I'm wondering if I could take a propane torch to just the spots infected with the hydroids, killing them, but not all the good stuff on the rest of those rocks.

Anyone know what these are in the 2nd photo. In the water, the white thing opens up a bit and has very very short tentacle-looking things.

Joe
 

Attachments

  • bye bye hydroids.jpg
    bye bye hydroids.jpg
    12.2 KB · Views: 317
  • s this.jpg
    s this.jpg
    38 KB · Views: 327
welcome. sorry I did not get to your thread sooner. Currently working on the data base for the site. I do not believe you should have the 125 gal. above your return pump and the gravity feed will tend to allow any sediment to pass through the pump and if the drain is not large enough the pump will not pump as designed. your proposal will shorten the seal life on the pump, and possibly create a massive amount of bubbles in the return. I would plug off the bottom drains, mount the pump next to the 125, drill and install an adequate sized bulkhead in the end glass about 4 inchs from the bottom of the tank to the bottom of the hole. connect the pump to this side bulkhead. My equipment room is a mess but I will post some pics next day or so of my sump system and all. The only use of bottom drains from the sump are for looping filter circulation within the sump such as carbon, pleated water cleaning, etc. hope this helps. also make sure you plan for an eventual pump seal leak and provide some way for the leak to be maintained until you can fix the pump seal. pm me any time you would like. i will be mostly on the data base work and may not read your posts as quickly as needed. so pm me and let me know when you post new and i will make it a point to visit your thread more frequently . welcome to the site.
 
I can't be of much help with your set up as I'm just a newbie to this myself but I absolutely love the display tank in the wall. That is my dream tank someday...guess I have to graduate first :grumble:
 
Back
Top