65 Gallon

613ReefGuy

Reefing newb
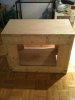
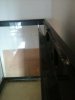
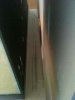
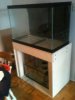
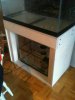
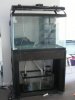
First off I would like to thank everyone on here for all of your help. This is currently where I stand on my DIY projects for my tank. My stand still needs to be faced, and needs doors, but all and all I am happy with it. I havent put the tank on it since it is resting on the stand I just bought (being return to lfs this weekend to buy a 125G instead.)

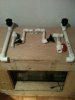
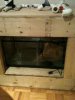
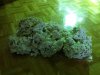
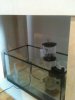
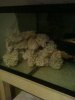
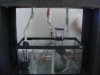
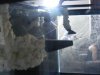
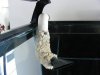
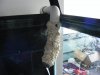
This weekend I will be draining the tank, and putting the 25 lbs of LR that is in it in a rubbermaid container. The tank is then off to get drilled, and when it comes back home the 25 lbs of LR from the tank will be glued together with the 25 lbs of LR posted in the pictures. Those rocks will be put in the tank, and I will work on attaching all of the plumbing.

I am going to dry fit the plumbing to make sure that its right, and fill the tank below the bulkheads, with my powerheads running for flow. Once I am happy with my plumbing I will let the glue dry, and then start running it all under water to clean the inside. Hopefully all will be good, and I can attach it all to the tank with no problems. Add some water to fill up my sump, and turn everything on and cross my fingers :) I think I will do the dead shrimp into the water right away to spike the ammonia levels and get the ball rolling. Another 25lbs of LR is on its way.

I want to get the cycle going on this one, so I can begin working on the stand and plumbing for the 125G tank.

I will update pictures whenever I can. I am sorry for the poor quality, but i am using an iPhone only :(
I would like a better camera, but this hobby is becoming a little expensive ;)
 

Attachments

  • Stand.jpg
    Stand.jpg
    23.8 KB · Views: 385
  • Stand, Pipes, Sump.jpg
    Stand, Pipes, Sump.jpg
    21.3 KB · Views: 433
  • Sump.jpg
    Sump.jpg
    25.1 KB · Views: 320
  • 25lbs Live Rock.jpg
    25lbs Live Rock.jpg
    42.9 KB · Views: 598
Hello wow what a heavy duty stand.Are you gonna get get a baby whale lol.
nice job don't think you will have any problems with deflection.Are you gonna set the tank on a piece of foam.Thanks for the pics
Happy tanks to ya
 
Hey guys, thank you. The stand isnt complete yet, but yes I do like to "overkill" things a little. I still have to face the front and sides with some nice oak plywood, and then I will work on my finishing trim work, doors and stain. That is the easy part though. Once you have it solid and level, the rest of it becomes easy....and you can always redo something without jepordizing the stand.

I havent really thought about foam, should I be looking to put some down?
 
Hello wow what a heavy duty stand.Are you gonna get get a baby whale lol.
nice job don't think you will have any problems with deflection.Are you gonna set the tank on a piece of foam.Thanks for the pics
Happy tanks to ya


AWW I want a baby whale!

Nice job I wish I had the tools to do such a thing I love DIY projects!
 
So I wasnt happy that I had very little room on the stand I built, so I had put things on hold and had one built. Just picked it up today (I had told him I would do trim and stain). While the stand was being built, I had my tank drilled and had a coast to coast installed. Just went and picked everything up today. 50lbs of dry rock in the tank, I have another 25 of live rock in a rubber maid container right now.

Tomorrow I will be working on the plumbing (I had the stand built so I could tuck it up to the wall and notch out where the pipes will be going). I will possibly add my salt water tomorrow, but not have it running through the sump until plumbing is done and odor free. I would like to get the cycle going as quickly as possible on this, so I can focus on the 120 gallon that I pick up this wednesday (holes drilled, coast to coast was being installed today).

Hopefully I will have something exciting for you guys soon
 

Attachments

  • Coast To Coast.jpg
    Coast To Coast.jpg
    14 KB · Views: 275
  • Ledge.jpg
    Ledge.jpg
    16.4 KB · Views: 305
  • Sump With Lots Of Room.jpg
    Sump With Lots Of Room.jpg
    18.3 KB · Views: 329
  • New Stand.jpg
    New Stand.jpg
    18.6 KB · Views: 408
  • New Stand and Sump.jpg
    New Stand and Sump.jpg
    21.5 KB · Views: 299
  • 50lb Of LR.jpg
    50lb Of LR.jpg
    19.8 KB · Views: 371
  • Bulkheads.jpg
    Bulkheads.jpg
    13.1 KB · Views: 305
Looks nice!

Im sure you are going to be much happier with the new stand. My stand is my most hated piece of equipment in my tank. I really wish i had a nice stand with room for sump.
 
I finished most of the plumbing today. I had to re-do my two return pieces, since they didnt fit anymore now that the coast to coast is installed. So I rebuilt a couple of returns, and my girlfriend used some of the epoxy glue (Green stick), and started to wrap some of the ugly pipes that will be visible. I like the way it turned out for sure. She basically just pressed a bunch of our dry rock that had chipped off during shipping. So we are going to do both returns much like this picture, and carry the rock up just a little bit higher than the picture shows. I will be picking up the 120 in a couple of days.
 

Attachments

  • Gabs Creation.jpg
    Gabs Creation.jpg
    23.3 KB · Views: 274
As some of you may know, my MH light had melted my center brace on my frame. I was dumb enough to cut it off, and this has delayed this tank drastically!! Every aquarium manufacturer had said their frames wont fit. Big Al's said they arent able to order them from All-Glass, another LFS said they could get them, but it could take months. I finally decided to email All-glass one more time and explain my story. A very nice lady responded to me on the same day asking for receipts....which were nowhere to be found obviously. She then replied that she would send out a frame at no cost and claim it to be a warranty issue!!

So this pretty much made my day at the time. I have since received it and it is the exact dimensions. This weekend I am going to replace the frames, and the moment we move this tank is ready for water :)
 
Well the time has finally come!!! I finally got ambitious this weekend and finished all my plumbing. I hope I did things right. As you can see my return lines both have a hole drilled in them to break the siphon in case of a power outage. I am still not sure how my return lines will look, but I wanted them to blend in nicely with the inside of the tank.

All the dry rock and live rock is already here, so I hope to test this early this week and then fill it towards the end of the week. My only other thing to worry about is how to hang my lights, but I already have the holes marked on the ceiling, should I feel confident enough to go with some kind of anchor (my light kit did come with them.)

Just wanted to give a quick upgrade. If you guys see anything wrong with the plumbing please let me know. Will update again once lights and aquascaping are done.
 

Attachments

  • 034.jpg
    034.jpg
    19.6 KB · Views: 297
  • 030.jpg
    030.jpg
    27.7 KB · Views: 285
  • 033.jpg
    033.jpg
    22.8 KB · Views: 267
  • 032.jpg
    032.jpg
    21.4 KB · Views: 286
  • 035.jpg
    035.jpg
    36.8 KB · Views: 277
  • 036.jpg
    036.jpg
    28 KB · Views: 276
  • 037.jpg
    037.jpg
    35.2 KB · Views: 281
Back
Top