Mega Powerful Nitrate and Phosphate Remover - DIY!

New Screen Material

Well after months of figuring out what are the best attributes are for a scrubber screen, and also after getting reports from hundreds of people as to what screen material worked best for them, I think I've come up with a material that is perfect for the job. I'm offering this screen for free to anyone who wants to try it (just pay shipping). Here are some pics, and some advantages, to this material:


ScreenFlex.jpg


ScreenThickness.jpg


ScreenFinger.jpg


ScreenRigid.jpg


ScreenCloseup.jpg


.


were did you find this screen at
 
Day 3 of my new scrubber..
I already see a change in my tank the glass seems cleaner and the brown algae on the sand is getting better

algaescrubberday3001.jpg
 
SantaMonica< My scrubber is doing a awsome job I wish I would have made it sooner, I no longer need to clean my glass everyday.. :-) I have one question once my sand bed is clear of the brown algae and the rocks are clean do I need to find a new home for my snails and Sand sifting star??
 
Q: I have lots of green hair algae all over my rocks, but my nitrate and phosphate always measure "zero" when I test it. How can this be? Are my tests bad?
A: No. Your tests are fine. What you are seeing is the power of algae at removing Inorganic Nitrate and Inorganic Phosphate (which is what test kits read.) You have so much algae in your display that all the nitrate and phosphate is eaten before your test kits can read it. Basically, you already have a scrubber; it's just in the wrong place (all over your rocks).

lol. It's so true and kinda funny after I read it. No wonder I have no phosphate and the nitrate is so low even without water changes.
 
Day 6 of my scrubber and pics of my tank

I have not had to clean my glass at all and the water looks GREAT!! the sand bed is still brown but not as bad as it was it has started to clear up


DAY 6
algaescrubberday6002.jpg


Tank Day 1
algaescrubber009.jpg


tank day 6 pics of mytorch and frogspawn coral
algaescrubberday6004.jpg


Flame scallop
algaescrubberday6006.jpg


This scrubber was the BEST THING I HAVE EVER DONE FOR MY TANK!!!
 
today is day 9 of my screen it has a brown slime on it it looks like what is growing on my sand bed do I need to wait till it's green b/4 I clean it?? I checked it this morning and the outlet were the water returns back to the sump it had like strings of brown going into it...here are a few pics
scrubberday9001.jpg


scrubberday9002.jpg


Part 3 of 3


Pump feeds: Since with a pump you have control over the flow, start with the size screen you can fit into your space. If the screen will go into your sump, then measure how wide that screen will be. If the screen will go into a bucket, then measure how wide that screen will be. Take the width you get, and multiply by 35 to get the gph you need. For example if you can fit a 10 inch wide screen into your sump or bucket, then multiply 10 by 35 to get 350 gph. Thus your pump needs to deliver 350 gph to the screen.

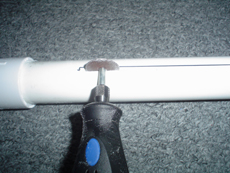
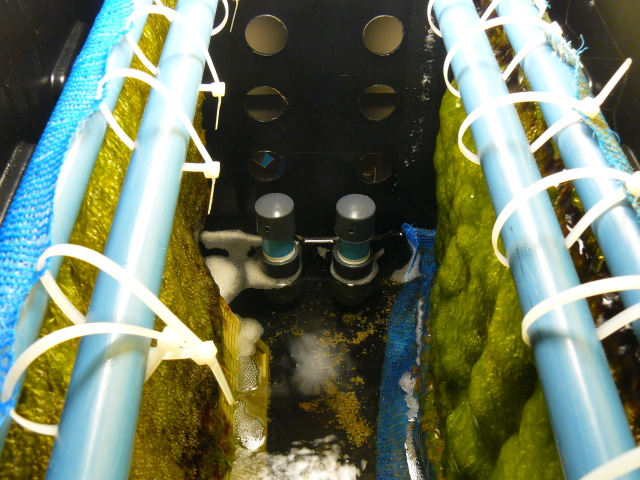
You can construct your setup using any method you like. The only difficult part is the "waterfall pipe", which must have a slot cut lengthwise into it where the screen goes into it. Don't cut the slot too wide; just start with 1/8" (3mm), and you can increase it later if you need to, based on the flow you get. I used a Dremel moto-tool with a "cut off wheel":

PipeDremel.jpg


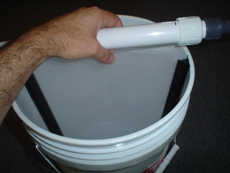
Now install the pipe onto the screen/bucket by tilting the pipe and starting at one side, then lowering the pipe over the rest. You may have to wiggle the screen in some places to get it to fit in:

PipeInstall.jpg


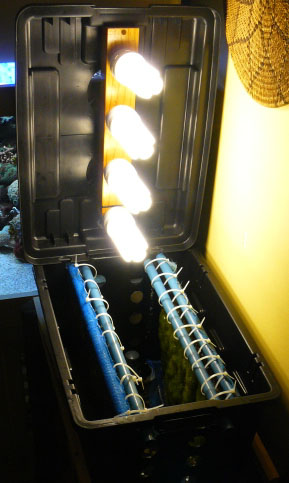
Lighting: This is the most important aspect of the whole thing. You must, must, have strong lighting. I'll list again the bulb I listed above:

23 Watt R40 Compact Fluorescent Flood 5100K Full Spectrum CFL

... This the MINIMUM wattage you should have on BOTH sides of your screen. You can get even higher power CFL bulbs, or use multiple bulbs per side, for screens larger than 12 X 12 inches, or for tanks with higher waste loads. The higher the power of the lighting on the screen, the more nitrate and phosphate will be pulled out of the tank, and the faster it will happen. You cannot have too much light. When some folks report back that their algae scrubber is not growing algae or working well, the problem is ALWAYS that they used weak lights, or the lights were more than 4" away. Every single time.


Operation:

Regardless of which version you build, the startup process is the same. First, clean the screen with running tap water (no soap) while scrubbing it with something abrasive. Then dry it off and sand it with sandpaper on both sides. Then get some algae (any type) from your system and rub it HARD into the screen on both sides, as deep and as hard as you can. Then run tap water over the screen to remove the loose algae pieces; you won't see the remaining spores that stick to the screen... they are too small, but they are there.

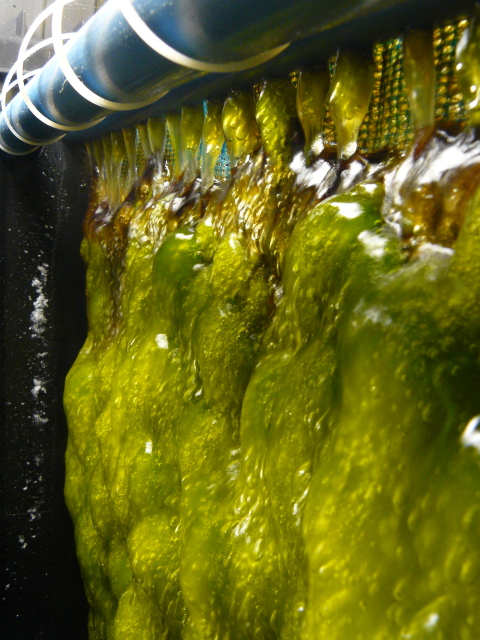
Put a timer on the light, for 18 hours ON, and 6 hours OFF. You will see absolutely nothing grow on the screen for the first two days. But on day 3 you'll start seeing some light brown growth, and by day 5 most of the screen should have a light brown coating. If this level of growth does not happen on your screen, your lighting is not strong enough (you used a weaker bulb), or it's not close enough to the screen (needs to be no more than 4" from the middle of the screen). Increase the bulb power, or move it closer.

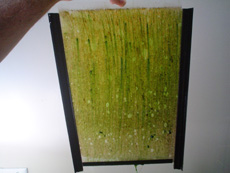
When the screen looks something like this:

ScreenBuildDay9outSmall.jpg


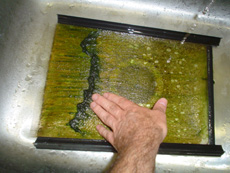
...then you want to give it it's first cleaning, on ONE SIDE only. Take the screen to the sink, run tap water on it, and just push the algae off with your fingers (not fingernails):

ScreenBuildDay9scrubbing.jpg


Wait a week, and clean the other side, gently. Wait another week and clean the first side again, etc. After a while you'll have to press harder to get the tougher algae off, and after a few months you'll probably need to scrape it with something, and it may eventually get so strong that you'll need a razor blade to scrape it off. But for now, be gentle; you always want some algae to remain on the screen when you are done. NEVER clean it off completely. Algae has to remain on the screen to do the filtering.

Don't forget to test your Nitrate and Phosphate before you start your filter, and each day after. I use Salifert:

Salifert Test Kits

Post your pics of how you build it, the growth day by day, and your nitrate and phosphate readings, so we can all see how you are doing! There is a lot of info that I did not include here (in order to keep this short), and I've been asked every possible question there is. So if you have an unusual situation, or you think you have thought of something "new", then post it :)
 
Last edited:
No, you need to clean it now, and every 7 days, no matter what it looks like. And clean the bucket too, since it's easy for you to get to.
 
i've been thinking about building one of these for my tank, but i have a small fuge already thats growing some calurpa and some green hair, do i really need one of these too? i mean, its not like it could really hurt anything, but would i see many if any benifits?

i guess the answer is probably yes, just cause i do build up a carpet of growth on my sand every couple weeks...
 
Last edited:
I already went to an art supply store and got one of those plastic canvas thingy for like $0.37. I'm gonna put it into my 5g home depot bucket fuge this weekend to try it out. The modification should be quite easy.

My Phosphate level is already at 0, but I still do have some green algae in the tank here and there. it's always fun to try something. :)
 
alrighty, well then i'm adding it,

the next question, should i just put it inline with the overflow before the fuge, or should i mount this up above the tank and just pump water from the tank up to this and then let it gravity back down to the tank?

i mean ideally i would like to have it under the tank in the cabinet, but that could get complicated.

wait, you know, i just had a much better idea....
i'm getting ready to build a new stand, so that i can have a larger fuge, so why not just incorperate this into the input to the fuge... i could build a bypass so that when i want to clean the screen all i have to to is move a valve or 2 and that would keep the water flowing into the fuge and whatnot, but would bypass the screen for cleaning purposes...

oh this just got a bunch spiffier...

hehehe
 
K I rinsed it off I didn't need to use my hand at all the water took it right off was that ok or should it have been stuck on to it better??

No, you need to clean it now, and every 7 days, no matter what it looks like. And clean the bucket too, since it's easy for you to get to.
 
I'm going to be posting new example designs soon, so if you have not already posted your pics, do so now and I'll include it for others to see.
 
I was just about to blow $300 on a skimmer. But after spending the last half hour or so reading this thread, I think I'll go this route first and see what happens. :Cheers:
 
Back
Top