the 210 gallon in wall project

ok, so, if you are about my age, you grew up watching the dukes of hazard... and you remember what the original Roscoe P. Coltrain sounded like when he said....

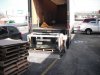
GOOD NEWS GOOD NEWS!!!

i just talked to my LFS guy, and he thinks that my tank will be there in about an hour and a half, give or take... so, i'm gonna put on my shoes, watch the rest of the eppisode of the new yankee workshop im in the middle of, and then head out...

OH BOY OH BOY
 
yea, well, like i said, in my LFS guys defense, he did call me and warn me that it wouldnt be there, i just didnt get the msg till after i had already driven in... but i just talked to him, he said, "wait like 30 min, and then head this way"

hehehehehe
i'm all excited...
 
TAAADAAA!!!!! its not just a dream any more... 160lbs of sand, 2 buckets of salt, a couple 4 foot t5 bulbs i wanna trade out, overflow kits, tank and all, now we're just waiting for them to ship him the tops...

here it is comming off the truck at the store, and then here it is in my truck in my shop waiting for saturday...
 

Attachments

  • 2-17-10 002  s.jpg
    2-17-10 002 s.jpg
    61.6 KB · Views: 229
  • 2-17-10 004  s.jpg
    2-17-10 004 s.jpg
    63.2 KB · Views: 235
  • 2-17-10 005  s.jpg
    2-17-10 005 s.jpg
    57.9 KB · Views: 252
i picked up another 420nm and a 454nm bulb to put in place of one 420 that has failed, and another daylight bulb i have, i want more erie glow blue and less white light... i'm just hoping it dosent cause lots of algae growth...

Yea, aint it great, i cant wait till saturday... and the great part is that now that the floor in that room is done, i can move all my water tanks in there and start stockpieling my RO water, for this weekend when it gets set in place and plumbed all together...
 
Awesome,great,can't wait to see it up and running.Make sure to leak test it,my first brand new Aqueon(210g.) leaked on me.Since I'm moving away from my 210,I can still live my dream through you.
 
how do ya'll suggest i do this leak test? I asked my LFS guy about putting at least an inch of water in the bottom while its still in the truck just to make sure the bottom is sealed up... but he said that it wouldnt really do any good just cause by moving it i might create a problem that wouldnt show up while its still sitting on the original factory pallet...
 
well, got all the measurements laid out on the stand, and i figured out that i needed to add another 2x6 under the back of the stand, just to make sure that the ply dosent flex or anything, and to make sure that the entire perimeter of the tank is actually sitting over 2x6's rather than just the ply...

also, cut the holes. I just cut them the same size as the overflows... but i'm still having thoughts of cutting more of the ply away in the middle of the stand, i dont know why, but i saw at the LFS that he didnt use any ply under his 150's, just 2x4's around the perimeter, so, i should be able to cut away the ply and see the underside of the tank... maybe someday in the future i'll wanna use a heating blanket type heater or something, i dunno, but cutting some away shouldnt hurt anything, and opens options... hmmmmm
 

Attachments

  • 2-18-10  s.jpg
    2-18-10 s.jpg
    77.8 KB · Views: 191
After the tank is in place,fill it up half way with water.Check all the seams especially around the bottom.Only the bottom of the frame needs to be supported since the trim is the frame with cross protection to keep the seams from pulling apart.You shouldn't have any problems cutting a bigger hole in the middle.

If you look at the picture-my tank is only supported by where I put the white arrows.Does the bottom of your tank look like the pic shown with the cross braces?

2108167.jpg

2108160.jpg
 
yea the bottom of my tank and the top too both have 2 front to back braces, and then the black plastic going all the way around the perimeter...

ok, i wasnt sure if the cross braces were verticle support for the bottom or if they were just there to keep the bottom of the front and back of the tank from spreading..

so, i think what i'll do is i'll cut the hole in the middle, making sure that i leave the middle brace supports covered...

oh, also, wanted to show yall the sump.. hehehehe
 

Attachments

  • 2-18-10 002  s.jpg
    2-18-10 002 s.jpg
    36.4 KB · Views: 209
  • 2-18-10 001  s.jpg
    2-18-10 001 s.jpg
    55.6 KB · Views: 202
Last edited:
I can't wait for tomorrow!!!! Reading this whole thread almost makes ME feel like I'm getting a new tank! Looking great so far project!

Brian
 
Project5k,

I know you were batting this around in this thread at one point, so I figured I'd send this over to you. I'm also in the middle of an in wall project, I initially had a 55g and I painted the background blue...Looked good, but with the tank being higher in the air It was near impossible for me to do anything with it, I would have to move a rock, and then run to the front of the tank, it was a PITA!!... So I decided on some sort of fabric, I went out today to find some and came up with this..

I got it at Lowes..It's a curtain. or drapes or whatever they call'em...It blocks out 99.8% of the light and I think it might help with keeping the water temp warm as well.

I decided on this, because I may want to change the color on the 3 sides now and again, this would make it easy. I bought some velcro strips and stuck it on...Easy as pie. Looks good. When you first see the fabric in the bag it comes in, you can see a weave in it, I was hesitant because of the weave in it, but you can't see it when it's on the tank.

It's 52" W 63"L and is easy to cut. Cost $26.97

Here are some pics to give you and example...They're with my phone so excuse that and my fingerprints all over the glass. The 3rd pic is the tank before, and the last pic is with only the back side done...
 

Attachments

  • Eclipse Fabric.jpg
    Eclipse Fabric.jpg
    29.3 KB · Views: 197
  • Eclipse2.jpg
    Eclipse2.jpg
    33.1 KB · Views: 220
  • rockpile.jpg
    rockpile.jpg
    48.4 KB · Views: 210
  • black.jpg
    black.jpg
    43.1 KB · Views: 214
Back
Top